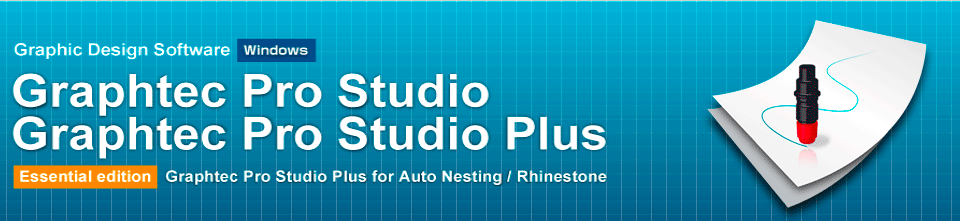
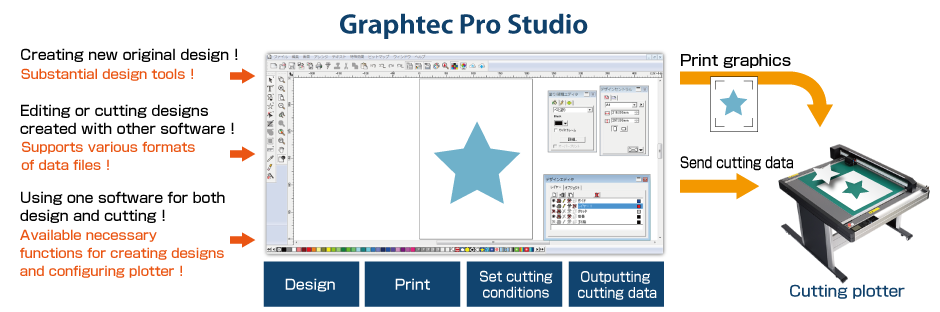
fbpx

gps slide

Grapthec Pro Studio

It is the software for creating original designs and has enhanced functions such as auto-shapes, shading, and editing functions. It is like the popular graphics design software as the Adobe Illustrator and CorelDRAW. It can also configure the cutting conditions and other settings on the plotter. Importing of EPS, Ai, CMX, and PDF file types are supported. Graphics created with other popular design software can be imported into this software.

Supported OS : Windows10 / 8.1 / 7

08


Major features of Graphtec Pro Studio

Creating the registration marks.

The registration marks can be added into the arts board of the design application software. It can be selected from 10 patterns according to the design object size and the precision of axis alignment in the Print & Cut applications.

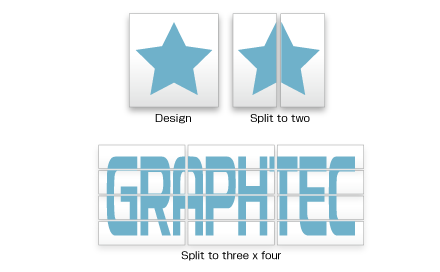
Tiling (split the object)

The cutting object can be split into smaller tiles. When the object needs to be placed to the surface made by multiple panels or is larger than the width of the media, the object can be split to size for fit it.
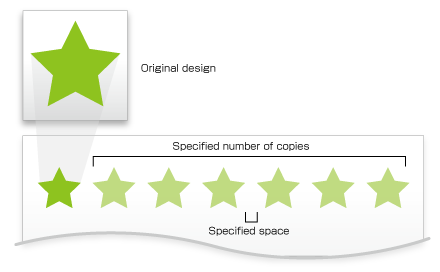
Matrix copy

It is used for creating multiple copies of the same object. The object is copied in specified matrix condition.

Weed lines and border

The border line and weeding lines can be added around the cutting object automatically and then it is cut. It makes easier to remove the excess material from the media.

Tool assignment

Graphtec Pro Studio is able to assign the tool condition to the each color or the layer. The settings of tool condition as force, speed, quality (acceleration) and others can be set for the each color or the layer. It can be performed in a single job by process of different types.

Supports newest ARMS 8.0

It supports ARMS (Advanced Registration Mark Sensing system) 8.0. New functions such as supporting processing on the reverse side, reversed color mark, Data Link Function etc are available. It enables to enhance usability
Show Details

Offline operation using the USB flash memory

Plot data is created from the design by using Cutting Master 4, then it is saved to USB flash memory. The plot data file can be selected from the USB on the plotter, then cutting is performed. This simplified work-flow enables users to operate without a computer.
* The USB flash memory format only supports FAT32.
 Please note that NTFS and exFAT are not supported.

[Compatible models] FC9000 / CE7000 / CE LITE / FCX4000 / FCX2000

Data management using bar-code with USB flash memory

In Print & cut operation, the plot data is automatically selected from USB flash memory by scanning the bar-code printed on the media. Bar-code is created by using Graphtec Pro Studio. This prevents the usage of incorrect data, and improves work efficiency.
* The USB flash memory format only supports FAT32.
 Please note that NTFS and exFAT are not supported.

[Compatible models] FC9000 / CE7000 / FCX4000 / FCX2000

Copy of data with registration marks

After data is sent the first time, it can be copied multiple times without a PC.
[Compatible models] FC9000 / CE7000 / CE LITE / FCX4000 / CE6000 PLUS / FCX2000 / FC8600 / FC4500

In the FC9000 / CE7000 / FCX2000 / FCX4000, the first four marks are scanned on the first sheet, and only the first mark in subsequent sheets. Graphtec Pro Studio is able to configure FCX2000 / FCX4000 to execute copy in this condition. This improves productivity by shorting scan detection time.

Reverse side Cutting/Creasing using registration marks

Cutting and creasing can be aligned to the printed graphics even if processing is performed on the reverse side of the media. This prevents any scratches or damage to the printed graphic. Graphtec Pro Studio is able to configure FCX2000 to execute the process in this condition.
[Compatible models] FCX4000 / FCX2000

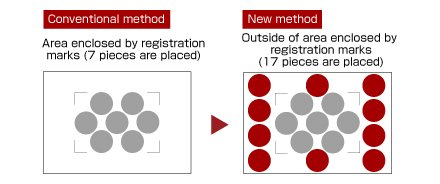
Expanded cutting area

It expands the cutting area to include objects outside of the area enclosed by registration marks. Production efficiency is enhanced by reducing media waste.
[Compatible models] FC9000 / CE7000 / CE LITE / FCX4000 / CE6000 PLUS / FCX2000 / FC8600

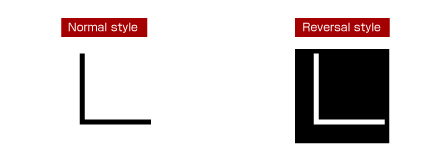
Creating registration marks in reversed color

The Cutting Master 4 is able to create the registration marks either one of the normal style or reversal style. The reversal style mark has the reversed color and it is able to detect the mark on the media such as the type of glossy or shiny. It enables to expand the compatible media for the Print & Cut applications.
It able to specify the color of registration mark line and the color of paint around mark after software version 2.10.
(A model that supporting color mark: FC9000 / CE7000 / CE LITE-50)
[Compatible models] FC9000 / CE7000 / CE LITE / FCX4000 / CE6000 PLUS / FCX2000 / FC8600

Lines pattern

It can set configuration of line intuitively to plot such as style, width, corner, color, join, end cap, and position.

[Compatible models] CE LITE / FCX4000 / CE6000 PLUS / FCX2000 / FC8600

Outline

It creates new lines (paths) in specified space from the object.
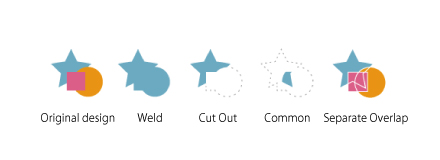
Combine objects

It can edit the overlapped objects using the effects function into a single object or multiple objects.
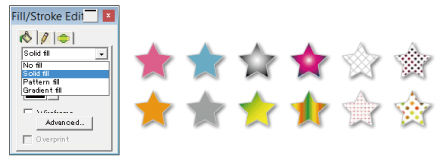
Fill

It can easily paint colors on a object in the illustration and can also fill in a gradient or pattern.
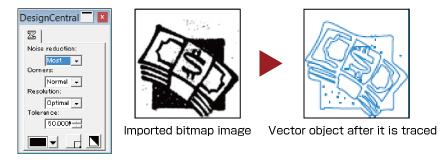
Auto-trace

The imported bitmap (raster) images is able to be converted into vector objects. There is a powerful noise reduction function.

Imports Adobe Illustrator/CorelDRAW file

It supports the importing of files in the ai format, cmx format, and others into Graphtec Pro Studio. Graphics created with popular design software such as Adobe Illustrator or CorelDRAW can be imported without converting the file format. The cutting job can be performed using only Graphtec Pro Studio even if the design is created using Adobe Illustrator or CorelDRAW by a designer.


Graphtec Pro Studio Plus (Option)

It is enhanced edition of Graphtec Pro Studio. It is optional software with functions for improving productivity and creating advanced designs. Additional functions include: transformation of graphics and characters, automatic sequence number inserting, bar-code, templates for rhinestone creation, nesting, directional change of cutting lines, changing cutting order, and more.
In addition to the full function version software "Graphtec Pro Studio Plus", two new edition in to lineup , "Graphtec Pro Studio Plus for Auto Nesting" and "Graphtec Pro Studio Plus for Rhinestone" as a essential function version software which enable to choose depending on customers application.

Supported OS: Windows 10 / 8.1 / 8 / 7


Major features of Graphtec Pro Studio Plus

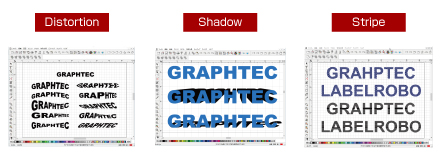
Deformation, shadow, and stripe of texts and shapes

It is able to easily deform and decorate texts/letters and shapes with the transformation,  shadow, and stripe function.
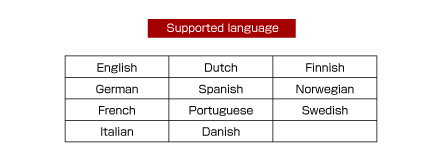
Check the spelling

Spell of wording is able to check in 11 languages. It enables to keep higher productivity by preventing misspelling.
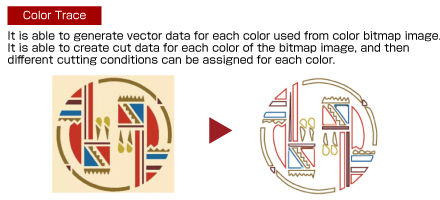
Vectoring

There is more a special tracing function to vectoring the bitmap image in the Graphtec Pro Studio Plus.

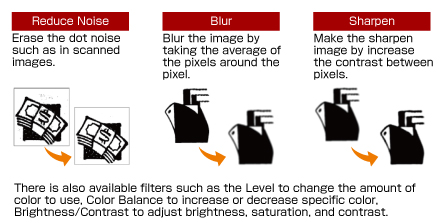
Filter for bitmap image

It is able to process the bitmap image by applying a filter for removing dot noise or controlling sharpness.

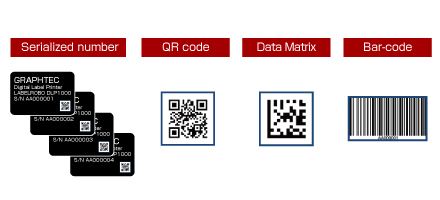
Serialized number, Bar-code, QR code, etc.

It is able to easily create coded patterns, such as a bar-code, QR code, or data matrix code, and printing objects having variable data.

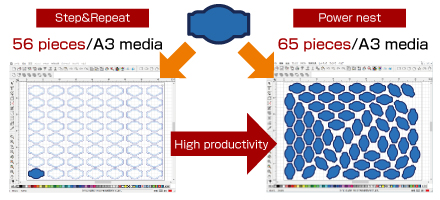
Power Nest (Nesting)

A object is able to be efficiently pleased on media using power nest (nesting) function. It enables to reduce a cost of media by less waste and also reduce processing time of cutter.
* Available Function of Graphtec Pro Studio Plus for Auto Nesting

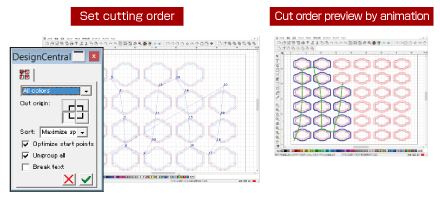
Cutting simulation (Changing cutting order)

It is displayed the order of cutting by animation. The cutting order of objects can be set automatically or manually. It enables to improve productivity by reducing the cutting process time and to prevent problems in the cutting process by previewing the cutting order of object.
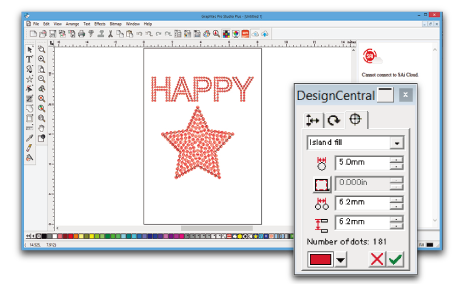
Rhinestone Creation

Easily create rhinestone designs by selectin one of 8 presets, setting the hole size, and the pattern.
* Available Function of Graphtec Pro Studio Plus for Rhinestone


Main function

CategoryFunctionGraphtec Pro Studiofor Rhinestonefor Auto NestingGraphtec Pro Studio PlusDescription
File Acquire Image X X X X Capturing the image from the scanner.
Archive to Cloud X X X X Saving the job to the SAiCloud.
Send to Approval Tool X X X X Saving the job to the approval tool on the SAiCloud.
Work-space X X X X Switching the location of the menus and buttons like the style of the software that is familiar with you.
View Color X X X X Editing the color.
Show X X X X Displaying the ruler, grid and guide lines.
Snap X X X X Moving the object relative to the guide or grid.
Arrange Group X X X X Grouping objects.
Lock X X X X Locking the object for setting to non editable.
Contour Cut X X X X Creating a contour cutting line of objects.
Convert to Outlines X X X X Converting the object to path.
Path Direction X X X X Specifying the direction of cutting when the object data is output.
Order X X X X Arrange the selected object as bring to the front or send to the back.
Align X X X X Aligning the object to reference that is specified in sub-menu.
Distribute X X X X Distributing all objects evenly in the effective area by the specified method.
Nest - - X X Performing the simple nesting by moving the object along the X- or Y-axis.
True Shape Nes - - X X Performing the advanced nesting by moving the object including the rotation.
Deskew - - - X Correcting a skew of the imported image from the scanner.
Step and Repeat X X X X Performing complex replication as the matrix copy.
Auto Serialize - - - X Creating a copy of the object that has the serialized number in each copy.
Cut Order - - - X Starting the cutting simulator that shows the cutting order in the animation.
Text Font X X X X Setting the font type of the character.
Justification X X X X Aligning the string of text.
Find/Replace X X X X Search or replacing the text.
Check Spelling - - - X Checking the spelling.
Case X X X X Switching between uppercase and lowercase in letters.
Insert Symbols - - - X Creating the Braille, bar code, QR code, and data matrix.
Effects Combine X X X X Combining objects.
Lens - - - X Changing the appearance by applying a lens effect to overlapped objects.
Contour Cut X X X X Creating the cutting line of objects.
Contour Cut Mark X X X X Creating the registration marks to the object that has  the cutting line.
Page Contour Cut Mark X X X X Cutting the object that is located the outside area enclosed by the registration marks.
Distortion - - - X Deforming the object.
Shadow  Only drop shadow Only drop shadow Only drop shadow X Adding shadows to objects.
Color Trapping - - - X Removing the overlapping portions of objects without a gap
Brend  - - - X Creating new objects that is changing the shape and color in stepwise between the specified two objects.
Rhinestone Fill - X - X Creating holes for the rhinestone that fills the object or fits the contour of the object.
Bitmap Bitmap Edit Toolbar X X X X Editing a bitmap object.
Vectorize (Auto-trace) X X X X Automatically converting the bitmap object to the path.
Vectorize (Others) - - - X Converting the bitmap object to the path.
Rasterize - - - X Converting a vector object into a bitmap.
Filters - - - X Applying filter effect to the bitmap object.
Tools Vector Eraser X X X X Clearing any objects in the area that specify by dragging of the eraser tool.
Cleaver by Path - - Splitting the created object, each split object can be edited.
Cut/Plot Preview window  X X X X Moving the tool carriage that response to the position change of the cutting job.
Preview X X X X Showing the actually cutting job size by moving the tool carriage.
Copies X X X X Specifying the number of copies of the job.
Repeat job X X X X Specifying to send the job to the cutter repeatedly.
Centering X X X X Specifying location of the job on the page.
Rotate X X X X Rotating the job in 90 degree.
Mirror X X X X Creating the mirror image of the job.
Total tiles X X X X Displaying the total number of tiles. (Indication only)
Weed lines X X X X Adding lines for weeding.
Weed border X X X X Adding the border line in the specified margin for weeding.
Driver option Color only Color only Color only X Enabling to specify the cutting condition for each color / layer.
Change order of color or layer Color only Color only Color only X Specifying the cutting order for each color / layer.
Pause between colors or layers Color only Color only Color only X Pausing after the end of cutting of each color / layer.
Import or export the cutting condition settings X X X X Saving or loading the cutting conditions.
Over cut X X X X Cutting the contour line longer by the specified length in order to completely cut objects.
Eliminate line-segment overlap X X X X Deleting the overlapped paths or others.
Position offset X X X X Moving the cutting job in specified distance.
Offset in registration mark X X X X Adjusting the cutting position within the area enclosing the registration marks.
Divide (cut segment) X X X X Performing the process for each segmented area when there are additional registration marks on the cutting job.
Revers-side Registration Mark X X X X Making process at the reverse-side using the registration marks printed on the front surface.
Save to file X X X X Creating the plot file for offline operation.
Use Bar-code X X X X Creating the bar-code for managing the cutting data.
Reversed color mark X X X X Creating the registration marks in reversal color that is the white mark on black background.
Color selection of mark X X X X Specify the color of mark line and the color of paint around mark.
Smart Nest - - X X Dividing the data and arrange it in the margin area of the media, when cutting data larger than the media size.

*   X : Available.

Supported file format for import

File formatExtensionFile formatExtension
Scalable Vector Graphics(*1) SVG ROBO Master(*2) GSD / GST / GSP
D-CUT Master (* Graphtec Pro Studio only.) CUT EnRoute ENR
Portable Document Format PDF Flexi SIGN 5.x fs / pd / fd / fc / fe
Adobe Illustrator AI Flexi SIGN 6.x, 7, 7.5 FS
Encapsulated Postscript EPS Gerber Clip Art GCA
Auto CAD Interchange Format DXF HPGL hpg / hgl / plt
CorelDRAW Exchange Meta-file CMX HPHL / 2 hpg / hgl / plt
Windows Meta-file WMF Ikuras IK
Portable Network Graphics PNG Inspire SCI
Joint Photographic Experts Group JPEG JPEG JPG
Bitmap BMP Kodak  Flash-pix FPX
Tagged Image File Format TIFF Kodak Photo-CD PCD
Personal Computer Exchange PCX Macintosh Quick-draw PICT PCT
AutoCAD Drawing DWG Targa TGA
CASmate SCV Text File TXT
Clip Art CA Zsoft PC Paintbrush PCX
Digital Microprocessor Plotter Language PLT    

(*1)Restricted items in using SVG file
・When the SVG file containing registration marks is imported for print and cut application, it is required to specify or add contour cutting line.
・When editing contents in the imported SVG file, it is required to ungroup contents.
・Font size of text included in the SVG file are not reproduced. It is recommended that converting the font to outline before creating the SVG file.
・Following elements contained in the SVG file may not be reproduced correctly:Gradation, Transparent, Pattern, Image, Layer
・The SVG files created under the following conditions can not be used.
- When registration marks are contained in the SVG file, the SVG file is created by an application that is different
from the application created the register marks.
- The SVG file is created by the Export function. It is required to create the SVG file using Save As on File menu.

(*2)Restricted items in using file created by ROBO Master (file type: GSD, GST, GSP)
・When the ROBO Master file containing registration marks is imported for print and cut application, it is required to specify or add contour cutting line.
・When editing contents in the imported ROBO Master file, it is required to ungroup contents.
・When opening a ROBO Master file containing text, a screen for selecting fonts is displayed, it is required to specify the font to use.
The imported text is handled in the same way as the text written in Graphtec Pro Studio,
the outline may not match the display on the ROBO Master even if the same font is specified.
It is recommended to convert the text to outline data in advance using the Join graphic menu on Edit menu of ROBO Master.
・Following elements contained in the ROBO Master file may not be reproduced correctly:Gradation, Transparent, Pattern, Image, Layer, Font.

System requirements

ItemDescription
Supported cutting plotter FC9000 / CE7000 / FCX4000 / CE LITE / CE6000 PLUS / FCX2000 / FC8600 / FC4500 / CE6000 / FC8000 / CE5000 / FC2250
Supported OS Windows 10 / 8.1 / 7

* It requires an Internet connection in order for activation when starting the software for the first time.

Go to top